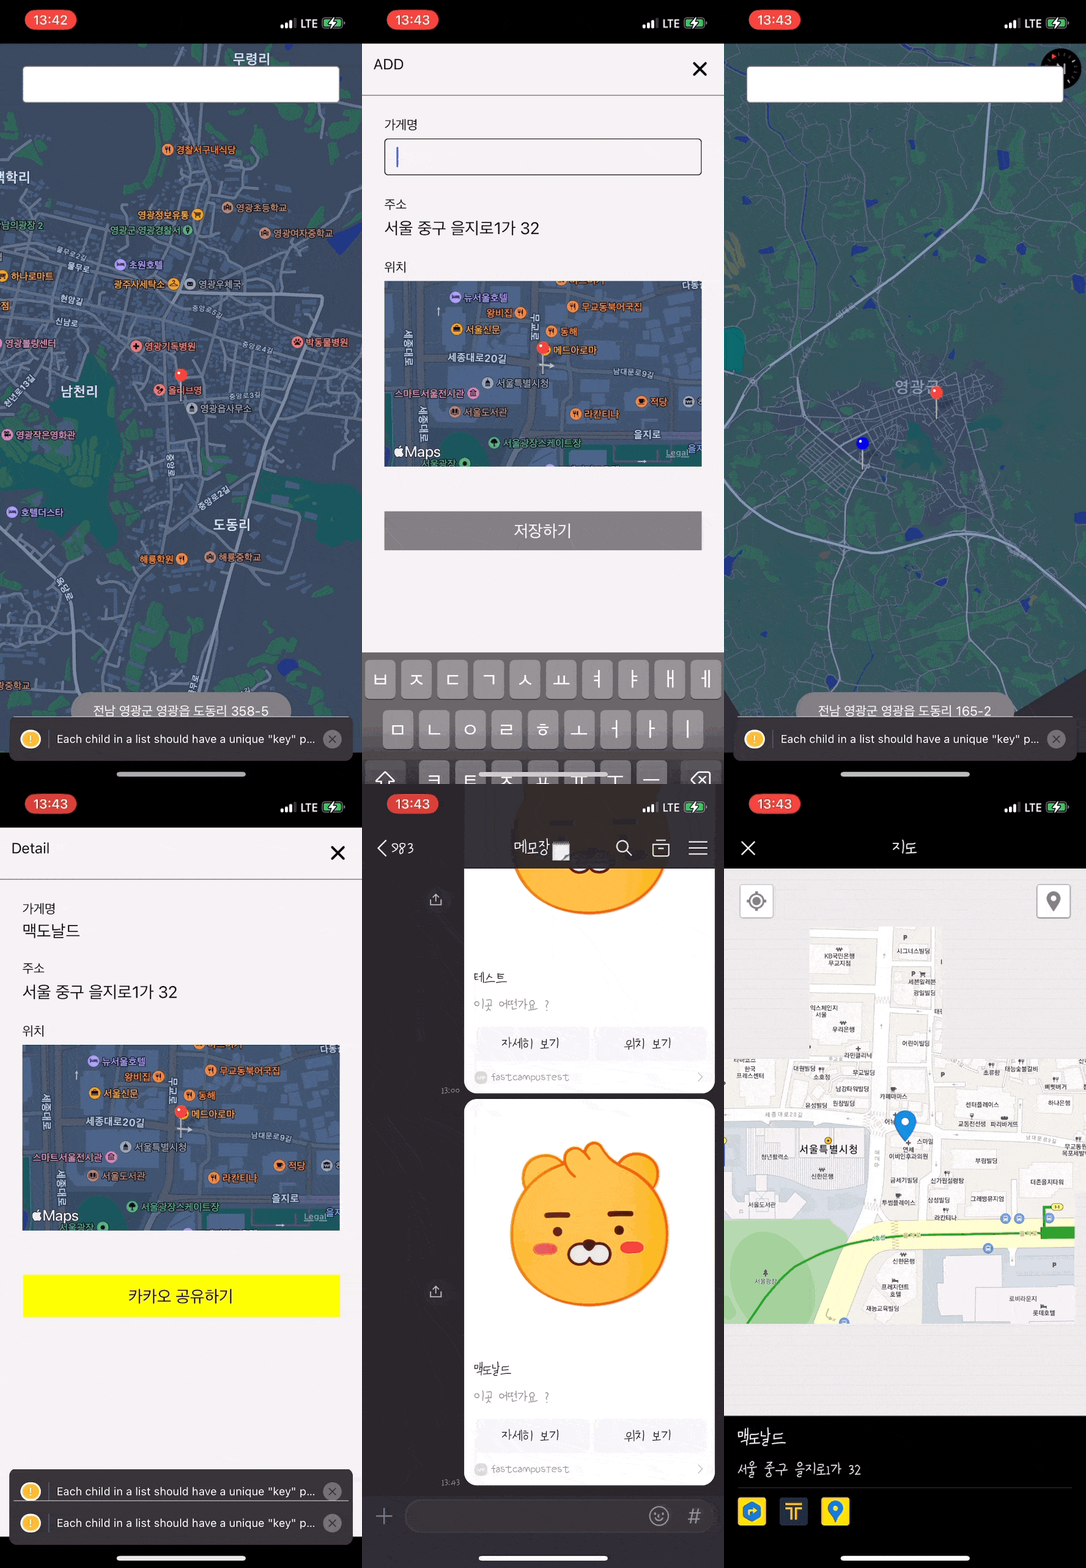
결과 화면

세부 요구사항
- 지도를 통해 저장된 맛집 리스트 확인가능
- 맛집으로 등록된 마커 클릭 시 해당 맛집 정보 확인가능
- 최초 로딩 시 권한이 있는지 체크하고, 있다면 현재 위치를 표시함
- 검색바에서 주소 검색하여 해당위치로 이동가능
- 맵을 길게 누르면 해당 위치의 주소를 불러옴
- 지정된 주소가 있다면 등록하기 버튼으로 맛집 등록가능
- 등록 시 주소와 가게명 입력
- 상세화면에는 가게명과 주소가 보임
- 카카오 공유 가능
react-native-vector-icons
react-native-vector-icons를 사용하기 위해 여기를 참고하여 초기설정을 해야 한다.
node_modules → react-native-vector-icons → Fonts폴더를 ios 프로젝트에 붙여 넣는다.
프로젝트 폴더 > Info > 우클릭 > open as > source code > 다음내용을 작성한다.
1
2
3
4
5
6
7
8
9
10
11
12
13
14
15
16
17
18
19
<key>UIAppFonts</key>
<array>
  <string>AntDesign.ttf</string>
  <string>Entypo.ttf</string>
  <string>EvilIcons.ttf</string>
  <string>Feather.ttf</string>
  <string>FontAwesome.ttf</string>
  <string>FontAwesome5_Brands.ttf</string>
  <string>FontAwesome5_Regular.ttf</string>
  <string>FontAwesome5_Solid.ttf</string>
  <string>Foundation.ttf</string>
  <string>Ionicons.ttf</string>
  <string>MaterialIcons.ttf</string>
  <string>MaterialCommunityIcons.ttf</string>
  <string>SimpleLineIcons.ttf</string>
  <string>Octicons.ttf</string>
  <string>Zocial.ttf</string>
  <string>Fontisto.ttf</string>
</array>
react-native.config.js파일을 react-native 프로젝트의 루트에 생성 후 다음을 작성한다.
1
2
3
4
5
6
7
8
9
module.exports = {
  dependencies: {
    'react-native-vector-icons': {
      platforms: {
        ios: null,
      },
    },
  },
};
android/app/build.gradle 경로에 다음 내용을 추가한다.
1
apply from: "../../node_modules/react-native-vector-icons/fonts.gradle"
react-native-maps
여기를 참고하여 초기설정을 한다.
google cloud console에서 api key값을 받아온다.
npm install —save react-native-maps, pod install을 진행한다.
android Mainfest에 key값 및 추가작성한다.
google maps에서 latitude(위도)값과 longitude(경도)값을 url에서 가져올 수 있다.
MapView를 import하여 위도와 경도값으로 위치를 띄울 수 있다.
1
2
3
4
5
6
7
8
9
10
11
import MapView from 'react-native-maps';

<MapView
        style={\{flex: 1}\}
        region={\{
          latitude: 37.3331425,
          longitude: 127.541649,
          latitudeDelta: 0.015,
          longitudeDelta: 0.0121,
        }\}
      />
맵은 스타일에 지정되거나 react-native에서 계산된 너비와 높이에 따라 크기가 조정된다.
GeoLocation
현재 내 위치를 가져오기 위해 geolocation라이브러리를 사용하였다.
npm install @react-native-community/geolocation --save
설치 후 ios에서 info.plist 설정하고, android manifest파일을 설정한다.
다음처럼 사용가능하다.
1
2
3
import Geolocation from '@react-native-community/geolocation';

Geolocation.getCurrentPosition(info => console.log(info));
또한 Marker를 사용하여 표시가 가능하다.
1
2
3
4
5
6
 <Marker
          coordinate={\{
            latitude: currentRegion.latitude,
            longitude: currentRegion.longitude,
          }\}
        />
pinColor, onCalloutPress등 다양한 옵션들이 있다.
kakao local api 사용하기
kakao api를 사용하여 좌표를 주소로 바꾸거나, 주소와 키워드를 검색할 수 있다.
애플리케이션 등록 후 KAKAO API KEY에 rest api key를 작성한다.
좌표를 주소로 바꾸는 api
1 2 3 4 5 6 7 8 9 10 11 12 13 14 15 16 17 18 19 20 21 22 23 24 25 26 27
export const getAddressFromCoords = ( latitude: number, longitude: number, ): Promise<string | null> => { return fetch( `https://dapi.kakao.com/v2/local/geo/coord2address.json?x=${longitude}&y=${latitude}`, { method: 'GET', headers: { Authorization: `KakaoAK ${KAKAO_API_KEY}`, }, }, ) .then(result => result.json()) .then(result => { if (result.meta.total_count === 0) { return null; } if (result.documents.length === 0) { return null; } const addressItem = result.documents[0]; return addressItem.address.address_name; }); };1 2 3 4 5 6 7 8 9 10 11 12 13 14 15 16 17 18 19 20 21 22 23 24 25 26 27 28 29 30
export const getCoordsFromAddress = ( address: string, ): Promise<{latitude: number; longitude: number; address: string} | null> => { return fetch( `https://dapi.kakao.com/v2/local/search/address.json?query=${address}`, { method: 'GET', headers: { Authorization: `KakaoAK ${KAKAO_API_KEY}`, }, }, ) .then(result => result.json()) .then(result => { if (result.meta.total_count === 0) { return null; } if (result.documents.length === 0) { return null; } const addressItem = result.documents[0]; return { latitude: addressItem.y, longitude: addressItem.x, address: addressItem.address_name, }; }); };1 2 3 4 5 6 7 8 9 10 11 12 13 14 15 16 17 18 19 20 21 22 23 24 25 26 27 28 29 30
export const getCoordsFromKeyword = ( keyword: string, ): Promise<{latitude: number; longitude: number; address: string} | null> => { return fetch( `https://dapi.kakao.com/v2/local/search/keyword.json?query=${keyword}`, { method: 'GET', headers: { Authorization: `KakaoAK ${KAKAO_API_KEY}`, }, }, ) .then(result => result.json()) .then(result => { if (result.meta.total_count === 0) { return null; } if (result.documents.length === 0) { return null; } const addressItem = result.documents[0]; return { latitude: addressItem.y, longitude: addressItem.x, address: addressItem.address_name, }; }); };
firebase - realtime database
- ios 앱이름 : bundle identifier
- android 앱이름: app>build.gradle → applicationId
firebase의 realtime database를 사용하여 주소를 저장하였다.
npm install --save @react-native-firebase/app 설치 후 ios와 android 초기설정을 진행한다.
여기에서 raltime-database를 설정한다.
npm install --save @react-native-firebase/database와 pod install을 진행한다.
다음처럼 값을 저장하거나 불러올 수 있다.
1
2
3
4
5
6
7
8
9
10
11
12
13
14
15
16
17
18
19
20
21
22
23
24
25
26
27
28
29
30
31
import database from '@react-native-firebase/database';

export const saveNewRestaurant = async (params: {
  title: string;
  address: string;
  latitude: number;
  longitude: number;
}) => {
  // const ref = await database().
  const db = database().ref('/restaurant');

  const saveItem = {
    title: params.title,
    address: params.address,
    latitude: params.latitude,
    longitude: params.longitude,
  };

  await db.push().set({
    ...saveItem,
  });
};

export const getRestaurantList = async (): Promise<
  {title: string; address: string; latitude: number; longitude: number}[]
> => {
  const db = database().ref('/restaurant');
  const snapshotValue = await db.once('value').then(snapshot => snapshot.val());

  return Object.keys(snapshotValue).map(key => snapshotValue[key])
};
react-native-kakao-share-link
카카오톡으로 주소를 공유하기 위해 react-native-kakao-share-link를 사용하였다.
ios와 android 초기설정을 진행한다.
android 설정 시 이 페이지도 참고하였다.
